No products
Last blog articles
 Kel-Tec Sub 2000 9mm — The Home Defender
  DELTAC Extended slide lock for Glock Gen 1-4 VS Gen 5
  The Proper Pistol Grip
  Don’t Lose Your Thumb! How to Correctly Grip Your Revolver
 Search on blog

Viewed products
-

DELTAC® "Slingshot"...
Get 5% off when you buy 5 Get 6% off...
eBay feedback
99,4% of positive feedback
Item as described:
Communication:
Shipping time:
Shipping charges:
love it
djcarnage2013
AAAAAA
troy9193
Great part, and fast shipping.
michaeldurkee
Quick 3 day shipping and item as described. Good seller
jplog2146
Excellent transaction, as always, great seller! Buy with confidence!
killhouse2
Looks great and fits great
gp4lyfe.2013
Item as described. Quick shipping A+ seller!
fammof5
Great parts, service, and fast shipping.
mictetr_7
A+
oneup99
Super fast shipping
johnny12115
Fast reliable shipping and product as described. Excellent.
jonh1373
nice
musicman502006
good. ebayer
2578danf
Top quality EBay seller.
starship46
Great Transaction! Great Deal!
graniteguy52
A+
kc11276
Fast shipping great seller
krw1983
Great Seller!!!
lastofthebreed02
A+++ seller!!fast shipping awesome seller A++++
daneyboy007ayo
Highly recommend, fast shipping, pleasure to do business with. Thank you.
ldri1949
Perfect for my G19 Gen 5! I mean PERFECT! Thanks
jg60-2013
excellent
lesnyder45
Very nice
chevtrucken
Exactly as described, plus fast reasonable shipping and a great price. A+++++
comport8
Great service
jr2022
Last Product Reviews 


Store Reviews ( 0 )  (0/5)
(0/5)
(0/5) 


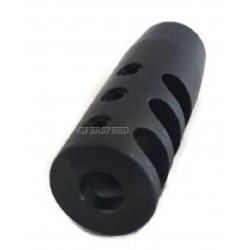
DELTAC® "Slingshot" muzzle brake Combo M14x1RH-7.62 - Complete threading kit
PKG140
New product
Get 5% off when you buy 5
Get 6% off when you buy 10
Get 7% off when you buy 15
Get 15% off when you buy 30
Get 30% off when you buy 50 or more

Volume discounts
| Quantity | Price | You Save |
|---|---|---|
| 5 | $87.86 | Up to $23.12 |
| 10 | $86.94 | Up to $55.49 |
| 15 | $86.01 | Up to $97.11 |
| 30 | $78.61 | Up to $416.20 |
| 50 | $64.74 | Up to $1,387.36 |
More info
- 1 Threaded muzzle break
- 1 adjustable M14X1 RH Die
- 1 Thread alignment tool
- #5 die handle
Muzzle Threading Instructions
Pack content
1 x Heavy duty Die Handle 38mm or 1.5" - ROUND...
0 Review(s) Get 5% off when you buy 5 Get 6% off when you buy 10 Get 7% off when you buy 15 Get 15% off when you buy 30 Get 30% off when you buy 50 or more
$19.99Online onlyIn Stock1 x M14X1 RH HSS Adjustable Round Threading...
0 Review(s) Get 5% off when you buy 5Get 6% off when you buy 10Get 7% off when you buy 15Get 15% off when you buy 30Get 30% off when you buy 50 or more
$14.99In Stock1 x M14X1 RH for 7.62 Thread alignment tool -...
0 Review(s) Get 5% off when you buy 5Get 6% off when you buy 10Get 7% off when you buy 15Get 15% off when you buy 30Get 30% off when you buy 50 or more
$12.99In Stock1 x DELTAC "Slingshot" muzzle brake for Yugo...
 2 Review(s)
 Get 5% off when you buy 5 Get 6% off when you buy 10 Get 7% off when you buy 15 Get 15% off when you buy 30 Get 30% off when you buy 50 or more
$49.99In Stock


Reviews (0)
Based on 0 reviews (0) (0) (0) (0) (0)Customers who bought this product also bought:
-

DELTAC®...
Get 5% off when you buy 5 Get 6% off when you...
-

AR-15...
Get 5% off when you buy 5 Get 6% off when you...
-
Deltac®...
Get 5% off when you buy 5 Get 6% off when you...
-
9/16" BLACK...
Get 5% off when you buy 5 Get 6% off when you...
-
DELTAC...
Get 5% off when you buy 5 Get 6% off when you...